Saturday, February 27, 2010

Thai Red Curry

Making Thai red curry feels like cheating. Well, if you use red curry paste it does. You hardly do anything, and you get a rich and complex flavor. No herbs and spices needed (well, except for the ones in the red curry paste) - I'm not used to that!


I basically followed this recipe, adding whatever vegetables I had on hand: broccoli, carrots, water chestnuts, and - of course - delicious sugar snap pea from our garden.


I started by mixing 3 T of red curry paste I got from Lee Lee's (the one doesn't contain any animal ingredients) with some basil and 2 cans of coconut milks. This made it very soupy, as evident in the pictures. Once the mixture was gently boiling I added the veggies and tofu, and simmered till the broccoli stalks were soft enough for me. Can't get much simpler than that, and still qualify as making dinner from scratch, can it?

Served it on long grain brown rice.

Thursday, February 18, 2010

Peanut Butter Chocolate Pillows

Doesn't the name make it sound really good? Well, if that wasn't the case for you, how about a picture?


The authors of Vegan Cupcakes Take Over The World have struck again! [Actually it was a long time ago, I'm just starting to catch up.] This time with a cookie book: Vegan Cookies Invade Your Cookie Jar.
For the same reason I love making cupcakes from VCTOTW, I also liked making these cookies - it's so simple, and yet looks so sophisticated and tastes so delicious and special. I had to wait till Valentine's Day to justify such decadence, just because it looks that way. But now I don't think I need any excuses for making it again.

Monday, February 15, 2010

Soymilk

I never thought I would actually have to milk soy beans to get their milk out, but that is exactly what I was doing!
I followed the instructions here. With a few exceptions, of course...
At first I removed the outer layers of the beans after they've soaked, per said instructions. A lot of them were very easy to peel, and practically came off of their own free will. Most of them, though, were more resistant. After awhile, seeing how many more beans I still have to peel, I decided to read the post and comments again, just in case I missed something. Sure enough, I did! One of the commenters mentioned that he doesn't remove the peel, and it may even add some fiber if you leave it on. Good enough for lazy me!
Other than that, I followed pretty much exactly, and here's what I got:


One quart of rich, creamy, soy-tasting drink. It was not the same as Silk or most other store bought soymilk, but it did remind me the soymilk-black sesame drink (minus the black sesame flavor) I got from an Asian store. I guess that makes sense. The soy flavor is pretty mild, and overall, I think it's a darn good drink!

I'm not sure I want to do it again, though. It was A LOT of work. And A LOT of dirty dishes to wash afterwards. I'm going to try another version, that cooks the beans before extracting the milk. We'll see if I like that method better.

Sunday, February 14, 2010

Happy Tiger Year!

I was invited to a new year party this week, but because I'm lame, I didn't go. It seemed like it would be a lot of fun, though: The guests were to bring a dish they considered to be Chinese, and their favorite Chinese quote. The best quote contributor will be the winner of a grand prize and two shots of sorghum wine!

So I thought that this dish would be a good choice:


Plus, it contains noodles, which are known to bring good luck to their New Year eater.
It's based on Bittersweet's recipe, but adapted to what I had on hand. Also, although I LOVE soba noodles, I decided to try acorn noodles - they turned out to be very good indeed!

Here's the original recipe as well as my adaptations:

Fish-Free Dashi

4 Cups Vegetable Stock
1 Heaping Tablespoon Instant Wakame Flakes [didn't have any, omitted]
3 Fresh Shiitake Mushrooms, Finely Chopped [chopped some brown beech mushrooms instead]
2 Tablespoons Tamari or Soy Sauce
2 Tablespoons Barley Miso Paste [used whatever miso I have at home]
1 – 2 Scallions, Thinly Sliced [no scallions, oh well]

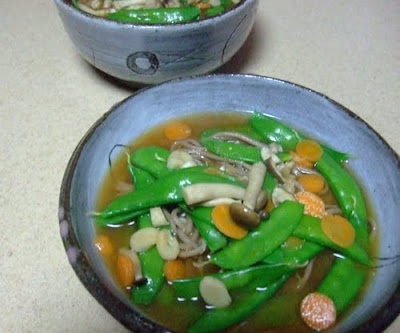
The instructions say to mix all these ingredients together, bring to the brink of a boil, and then pour it over cooked noodles and vegetables. As I mentioned before, I used acorn noodles (yum!) and the vegetables were snow peas from our garden (yum!) and carrots. Both veggies were cooked in boiling water for just a few seconds.

I liked it. Mark didn't care much for it. I suspect it's the miso. I doubt it was the absence of Wakami flakes, as Mark doesn't like seaweeds at all. Hopefully he will get the good luck anyway.

Oh, as for the quote, here's my favorite:

"A book is like a garden you can carry in your pocket".


Monday, February 1, 2010

Yogurt

As I opened the yogurt container, I couldn't help admiring the contents. As I spooned some of it into a bowl, I was amazed by its smooth texture and creamy consistency. It really was the most beautiful yogurt I have ever seen.


Doesn't it look awesome?

And to know that I made it all by myself - well - that's something to be proud of, don't you think?

The fact that it's incredibly easy to make it should not diminish the pride, either. All you need is milk, some yogurt, and a thermometer!

  • Heat 1/2 gallon of milk (fat content of your choice) in a pot over medium-low heat, stirring constantly, so it doesn't get burnt on the bottom. When the milk gets to about 160-170 degrees F (I take it to 170, but not a degree more), you can remove it from the heat and finally stop stirring (it takes about 15-20 minutes, and the milk starts to foam, but it should not boil).
  • Then let it cool to 120 degrees. To me this step takes about 40 minutes.
  • Once it's cool, transfer a bit of the warm milk to a small bowl containing 4 tablespoons of yogurt to make it a bit more liquidy, and then pour the yogurt into the warm milk, making sure it's mixed well.
  • Now cover the pot with the lid, wrap the whole thing in a big towel, and just let it sit overnight and the bacteria will do their thing.
  • Next morning, you'll get a nice wabbley yogurt. You will need to drain it, and you can drain it for as long as you like - mine was drained for 1.5 or 2 hours, and the product fits exactly in a 32 oz yogurt container. You can use a white sheet or a pillowcase.
You see - you can do it over and over again, if you just use the last of your yogurt to make a new batch. - A very small anna calls it a neverending yogurt. I followed her instructions pretty much to the point, except I found that going up to 190 degrees makes my yogurt look grainy (though it still tasted smooth), so I only go up to 170 degrees, as mentioned above.

Simple, ha? If you like yogurt, and don't like the jello-like texture store-yogurt has and/or don't want to pay too much for Greek yogurt, you should give it a try!